How to assemble a Seiko NH35, step by step.
There are dozens of YouTube tutorials on this. Most of them are competent. None of them tell you why. This is the walkthrough that does — the order of operations, the technique notes, the small mistakes that compound into rebuilds, all written by people who've watched students get every step wrong at least once.

Before you start
You'll need the following kit. A complete starter set from a reputable supplier — DIY Watch Club's basic kit at $230 AUD is the gold standard — covers everything below. At the bench we use professionally maintained versions of the same tools.
- Watchmaker's tweezers (size 3 or 5 — fine-tipped, antimagnetic, brass-tipped recommended)
- Hand-setting press (with multiple plunger sizes)
- Case-back opener (screw-type for threaded backs, lever-type for snap backs)
- Spring bar tool (Bergeon 6767 or equivalent)
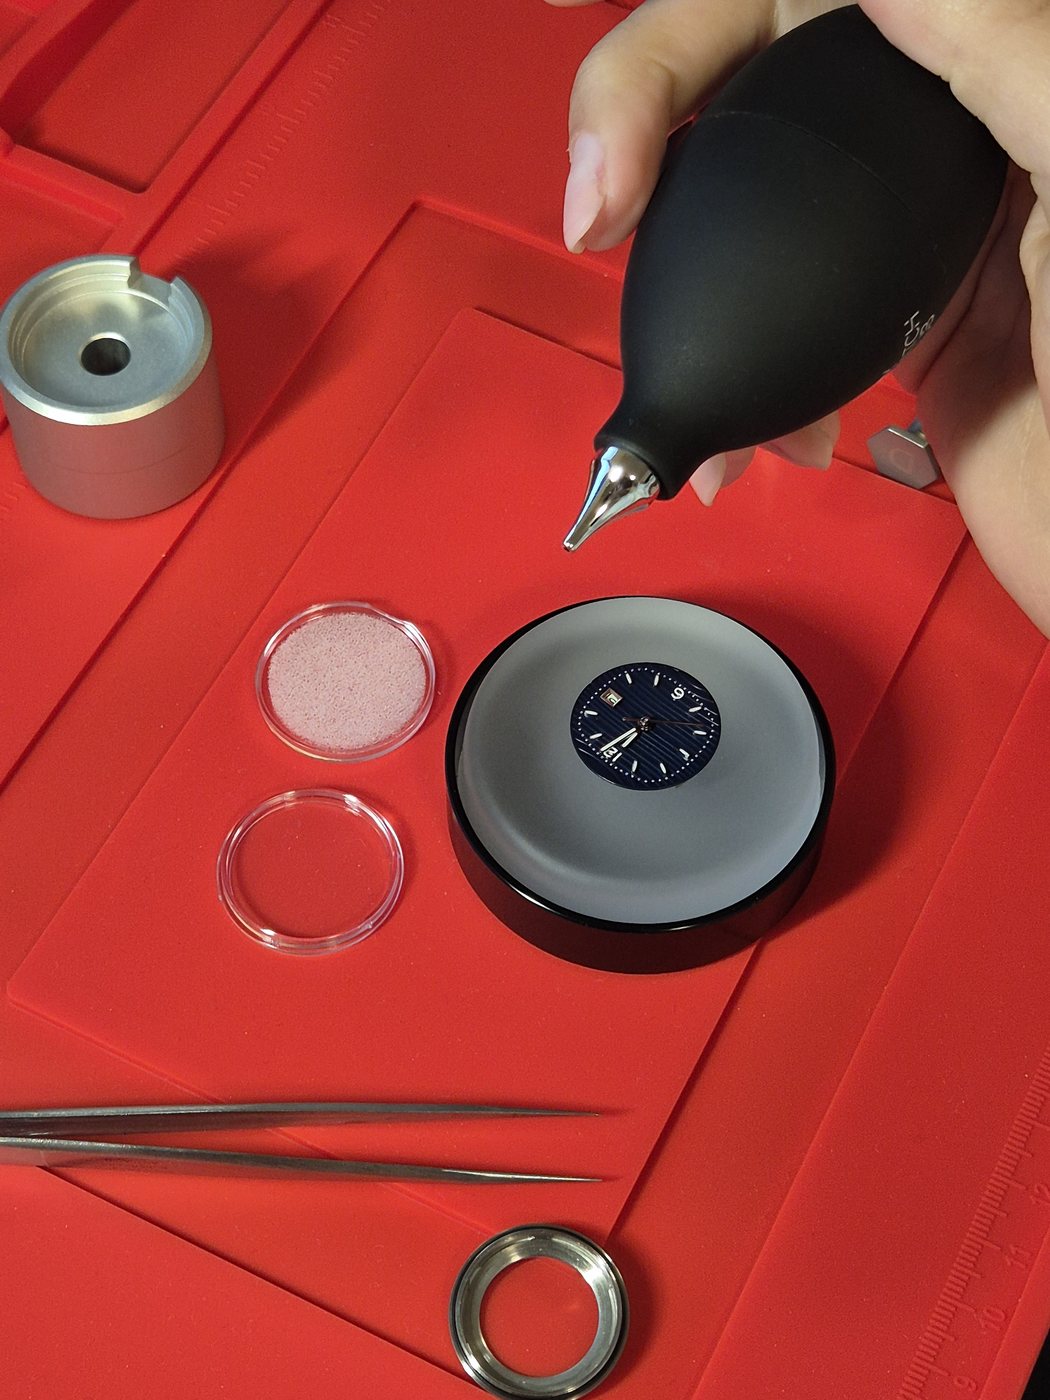
- Dust blower (bulb-style, never compressed-air-can)
- Movement holder (3D-printed or metal, sized for 27.4mm movements)
- Loupe or magnifier (10x minimum; head-mounted is easiest)
- Cleaning cloth (lint-free microfibre)
- Pith wood or rodico (for cleaning fingerprints)
- The NH35 movement, dial, hands set, case with crown and stem, bracelet or strap
The full sequence at a glance
- Prepare the movement — pull stem to neutral position
- Check the date wheel orientation
- Fit the dial to the movement
- Secure the dial
- Set the hour hand
- Set the minute hand
- Set the seconds hand
- Test the time-setting
- Fit the movement into the case
- Cut and insert the stem and crown
- Close the caseback
- Regulate on a timegrapher
- Fit the bracelet or strap
- Wear it
Prepare the movement
The NH35 ships with its stem already inserted. You'll need to remove it before you can fit the dial. The release mechanism is a small spring-loaded tab on the side of the movement, near the stem entry point.
Hold the movement in your movement holder, with the dial side up (the side without the rotor visible). Locate the small dimple or tab on the side of the movement plate near where the stem enters. With the stem pulled out to its time-setting position (position 3 — fully out), gently press down on the tab with the tip of your tweezers while pulling the stem out the side. It should slide free with no force.
Set the stem aside in a small dish. You'll cut and re-insert it later when the movement is in its case.
— Step 2Check the date wheel orientation
The date wheel sits underneath the dial. You can see it from the dial side — a large flat ring with numbers 1 to 31 printed in a circle around its edge. The numbers should be visible only through the date aperture of the dial you're about to fit. If they're not, you'll see partial numbers or an empty window.
Turn the movement so the date wheel is showing the number 1 (or whatever date you'd like the watch to start on). The date wheel has a specific orientation relative to the movement — it can only sit one way. You don't need to glue it or fix it in any way; it sits flush in its track and is held by the dial above.
Quick test: if you re-insert the stem and pull it to position 2 (the first click out), you can rotate the crown forward to advance the date wheel one click at a time. This is also how you'll set the date on the finished watch. Test that the wheel advances cleanly, then return it to your chosen starting number.
— Step 3Fit the dial to the movement
The dial has three small posts on its underside, called dial feet. These slot into matching holes on the movement plate. The fit should be snug but should never require pressing or forcing.
Hold the dial by its edge with your tweezers (or by the rim with a finger — clean hands only). Position it over the movement so the three dial feet line up with their corresponding holes. The dial should drop into position under its own weight. If you have to push, the feet are misaligned. Lift it up, rotate slightly, and try again.
Secure the dial
Once the dial is sitting flush on the movement with its feet in place, it's secured. The NH35 doesn't use dial screws — the feet hold the dial in place purely by friction. You can give the dial a very gentle rotational test (the dial shouldn't shift). If it does, the feet aren't fully seated. Re-press gently.
Use the dust blower to puff away any specks of lint or dust on the dial surface. Inspect under a loupe. Any fingerprint or smudge is a problem at this stage; use pith wood or rodico to lift it off the dial surface (never wipe — rubbing scratches the lacquer).
— Step 5Set the hour hand
The hands are the most precision-critical step of the entire build. The order matters: hour first, then minute, then seconds. The reason is mechanical — the hour hand sits on the outermost pinion at the centre of the dial, with the minute hand sitting on a smaller pinion above it, and the seconds hand on the smallest pinion above that. Fitting them in reverse order would mean working around hands you've already installed.
Pick up the hour hand with your tweezers. The hour hand has a hollow tube on its underside, called the hand-fitting hole, sized to grip the hour pinion (1.50mm diameter on the NH35).
Position the hand directly above the centre of the dial. Before you set it, glance at the date wheel — you need to confirm the hour hand will point at twelve when the date changes over. The simplest method: with the stem inserted and the crown set to time-setting position, rotate the crown until the date wheel just clicks over to the next number. At that exact moment, the watch is at midnight. Position the hour hand pointing straight up at the 12 marker.
Lower the hand-press's appropriate plunger over the hour hand's hub. Press down gently — only enough pressure to seat the hand on the pinion. You should feel a small click as it engages. Lift the press away.
Set the minute hand
The minute hand fits onto the minute pinion, which protrudes slightly above where the hour hand is now seated. The minute hand also needs to point at 12, because the watch is still set to midnight from the previous step.
Same technique. Pick up the minute hand with tweezers. Position above the centre. Lower the press's minute-hand plunger. Press gently. Confirm the minute hand sits flat above the hour hand without touching it (there should be a small visible gap — maybe a tenth of a millimetre).
If the minute hand rubs against the hour hand, the hour hand was set too high, or the minute hand was set too low. Either way you'll need to lift one off and re-seat. This is one of the most common rebuild reasons in any class.
— Step 7Set the seconds hand
The seconds hand is the smallest and most fragile of the three. It has the thinnest pipe (0.20mm — about the width of a human hair). Lift it carefully and position directly over the centre. Lower the press's seconds plunger and seat it gently.
The seconds hand should sit flat just above the minute hand — clearance of perhaps a tenth of a millimetre. It should also be aligned vertically: when the minute hand points at 12, the seconds hand should also point at 12 (or close to it — perfect alignment requires the watch to actually be ticking when you set it).
Common mistake: pressing too hard and bending the seconds hand. Brass hands bend easily under any pressure beyond a feather-light touch. If the seconds hand bends, replace it; trying to straighten it almost never works.
— Step 8Test the time-setting
Re-insert the stem into the movement (push gently until it clicks home). Pull it to position 3 (time-setting). Rotate the crown forward slowly. All three hands should advance smoothly and in sync. The minute hand should make a full revolution every time the hour hand advances one position. The seconds hand should sweep the dial cleanly.
Watch carefully for any rubbing or interference. If two hands collide, you'll feel it through the crown as a small drag, and you'll see it visually as one hand stopping briefly. Stop immediately if you feel this — pressing through it will damage the hands. Lift the affected hand off and re-seat it.
Run the watch through several complete hours of time-setting to check for issues. This is also a chance to check the date wheel: at midnight, the date should advance one click. If it doesn't, the date wheel may have shifted out of position during dial fitting, and you'll need to re-orient it.
— Step 9Fit the movement into the case
Remove the stem again before casing the movement (same release procedure as Step 1). The movement and dial will now drop into the case as a unit.
Most NH35-compatible cases have a movement ring inside — a thin plastic spacer that holds the movement centred and prevents it from rattling. Make sure the movement ring is sitting in the case before you lower the movement in. The movement should drop into the ring and sit flush at the case's bezel level.
If you can see any visible gap between the dial and the bezel, the movement isn't seated correctly. Lift it out, check the movement ring is positioned correctly, and try again.
— Step 10Cut and insert the stem and crown
The NH35 ships with a stem that's longer than the final crown position requires. You'll need to cut it to the right length so the crown sits flush with the case.
First, screw the crown onto the un-cut stem. Hold the crown by its threaded base with tweezers (not the knurled outer surface — that's the part you grip when winding, not when handling). The stem now has a crown on its tip but is too long.
Insert the stem into the movement (still in the case). The crown will sit too far out from the case. Measure how far. Mark on the stem where it would need to be cut for the crown to sit flush. Remove the stem and crown from the movement.
Unscrew the crown from the stem. Cut the stem at the mark using small wire-cutters or a precision file. Re-thread the crown back onto the cut stem (use a dab of Loctite 222 thread-locker on the threads — this prevents the crown from unscrewing in normal use).
Re-insert the stem-and-crown assembly into the movement. The crown should now sit flush against the case. Test by pulling the crown to position 2 (date setting) and position 3 (time setting). Both should engage cleanly.
Close the caseback
Replace the caseback gasket if it's been removed for cleaning. The gasket sits in a small groove around the inner lip of the caseback. Use silicone grease on the gasket before fitting to ensure water resistance.
For a screw-down caseback (most NH35 cases), use the case-back opener tool to engage the notches and tighten clockwise (looking at the caseback). Hand-tighten — never with significant torque. The case will form a watertight seal when the gasket is properly compressed.
For a snap-on caseback (rare for NH35 cases), place the caseback over the case and press evenly with both thumbs until it clicks home.
— Step 12Regulate on a timegrapher
Place the cased watch in the timegrapher's microphone clamp, dial-up. The timegrapher will display three numbers within about thirty seconds:
- Rate — how many seconds the watch is gaining or losing per day. Aim for within +/- 10 seconds. Better than that is good. Within +/-5 is excellent.
- Amplitude — how widely the balance wheel is swinging, in degrees. Aim for 270° or more in the dial-up position. Below 250° suggests a problem with the mainspring or escapement.
- Beat error — how asymmetric the ticking is, in milliseconds. Aim for under 0.5ms. Above 1.0ms is noticeable as an audible "limping" tick.
If the rate is off, locate the regulator on the movement (a small lever above the balance wheel). Move it toward the "+" mark to speed up, toward the "-" mark to slow down. Each tenth of a millimetre of movement equates to roughly five to ten seconds per day. Take small increments and re-test.
Test the watch in multiple positions: dial-up, dial-down, crown-down, crown-up. A well-regulated NH35 should hold rate within +/- 5 seconds per day across all four positions.
— Step 13Fit the bracelet or strap
Use the spring bar tool to compress the spring bars on the bracelet's end links, slot them into the case's lugs, and release the spring bars to lock them in place. The bracelet should swing freely on the lugs with no play or wobble.
If you're fitting a leather strap, the technique is identical. Make sure the lug width matches the strap width — a 20mm case takes a 20mm strap, end of story.
— Step 14Wear it
Set the time using the crown. Set the date. Wind the watch fully (about 30 turns of the crown). Listen to the ticking. Look at the seconds hand sweep. Put it on your wrist.
You've just assembled a working mechanical watch from a pile of parts. It will keep time for decades if you treat it well. It's yours.
Common pitfalls, in summary
- Dial misalignment — date window pointing the wrong way. Caught in step 3.
- Hands not flat — hour hand tilted causes minute hand to collide. Caught in step 8.
- Hands set in wrong order — trying to fit hour after minute is mechanically frustrating. Stick to the sequence.
- Stem cut too short — crown won't engage properly. Always cut conservatively.
- Caseback gasket missing — watch isn't watertight. Always inspect before closing.
- Movement ring missing — movement rattles in case. Always confirm before sealing.
- Regulation not done — watch keeps time at whatever the factory default was. Always regulate.
What this article can't replace
This is the most detailed walkthrough you'll find online for an NH35 build. It covers every step, every tool, every common mistake. What it cannot do is sit next to you at the bench and catch the mistake you're about to make. That's the difference between a tutorial and a class. Watching a video is reading the recipe. A class is having a chef in the kitchen with you.
Build one with us instead. Foundation tier at $595 covers the parts, the tools, the instruction, and the regulation. The watch on your wrist when you walk out is yours.
Book a class